<body><script type="text/javascript"> function setAttributeOnload(object, attribute, val) { if(window.addEventListener) { window.addEventListener('load', function(){ object[attribute] = val; }, false); } else { window.attachEvent('onload', function(){ object[attribute] = val; }); } } </script> <div id="navbar-iframe-container"></div> <script type="text/javascript" src="https://apis.google.com/js/platform.js"></script> <script type="text/javascript"> gapi.load("gapi.iframes:gapi.iframes.style.bubble", function() { if (gapi.iframes && gapi.iframes.getContext) { gapi.iframes.getContext().openChild({ url: 'https://www.blogger.com/navbar.g?targetBlogID\x3d17970835\x26blogName\x3dTres+Chic++Veronique\x26publishMode\x3dPUBLISH_MODE_BLOGSPOT\x26navbarType\x3dBLUE\x26layoutType\x3dCLASSIC\x26searchRoot\x3dhttps://treschicveronique.blogspot.com/search\x26blogLocale\x3den_US\x26v\x3d2\x26homepageUrl\x3dhttp://treschicveronique.blogspot.com/\x26vt\x3d-5681560264420060121', where: document.getElementById("navbar-iframe-container"), id: "navbar-iframe" }); } }); </script>

Tres Chic Veronique


an actual FO

Finally, I present to you:
Plucky Hanami!
Plucky Hanami

Plucky Hanami

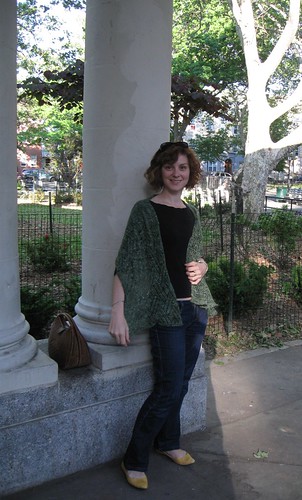
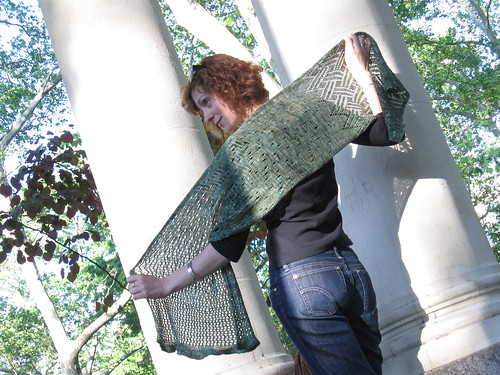
This stole was knit as a sample for Sarah, the Plucky Knitter, who sells her hand dyed yarns here. It is a merino/silk blend, and it is so smooth and slinky! The pattern required quite a few more yards than I had at my disposal (880 yds versus my 600 yds), so I had to improvise... I worked a provisional cast on, and knit the second half of the stole first (the "falling petals" or "asymmetrical YOs"), because it has a fixed number of rows. Then, I knit the first half of the stole (the "basket weave") until I ran out of yarn. I worked 3 repeats instead of the recommended 7 (actually, I started the 4th repeat, ran out of yarn and had to rip back!). Finally, I grafted the two halves together. I used US 4 Lace Addis, which are awesome, but smell like metal (you know what I mean?).

I tried saying "prune". It failed.
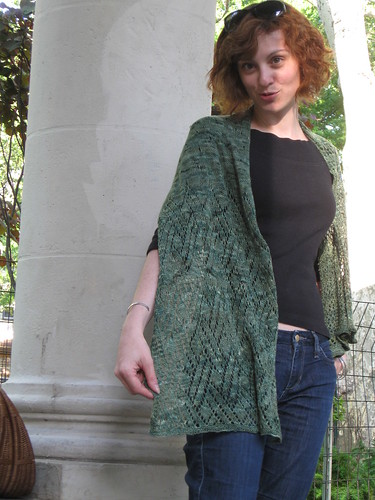
Prune!

Labels: ,

By Veronique
On Thursday, May 29, 2008
At 5/29/2008 02:27:00 PM


The Kitchen Cabinet Project

I have never received so many questions about a crafty project as I have with the Kitchen Cabinet Project! As fancy as I may make it sound, it's actually quite simple. So simple, in fact, that there is not a single online tutorial... *light bulb*

Here's an illustrated explanation of what I did (aka A Super Easy Tute):

I cut the fabric (Etsuko Furuya's Yellow Honeybee fabric, by Echino, purchased at Purl and Crafty Planet, thanks to Pam's eagle eyed tip), adding one inch to EACH AND EVERY side (1" for the top, 1" for the bottom, 1" for the left side, 1" for the right side). If your cabinet door is 18" X 30", you will cut a rectangle that is 20" X 32". --Why, yes, for the first cabinet door, I did not add enough ease, how did you guess?-- I used my rotary cutter, but I think it would be easy to cut with scissors, especially if you have picked a fabric with a geometric print like mine.
Kitchen Cabinet Project

See how I have one FULL inch on each side?
IKitchen Cabinet Project

Um, obvious: we unscrewed the handle. (Note: one person can easily do this project, I had to hire a set of hands to cover this door so I could take action pictures. Action pictures!).
Kitchen Cabinet Project

We used regular thumb tacks. We started with one tack per side, making sure to pull the fabric taut:
Kitchen Cabinet Project

Then we added a few more tacks on each side.
Now, on to those tricky corners! I folded the middle part, then flapped the 2 sides over, and stuck a tack right in the middle.
Kitchen Cabinet Project--Corners

Ta da! One covered kitchen cabinet door!
Kitchen Cabinet Project

Then, we just attached the door back on the kitchen cabinet frame, and screwed in a (new) handle through the fabric.

And voila! A fresh-looking kitchen!
Kitchen Cabinet Project

It's so easy that we made one itty bitty mistake. Can you spot it?

Next step: Scotchguard the whole thing, thanks to Preita's tip!

Labels: ,

By Veronique
On Monday, May 19, 2008
At 5/19/2008 02:51:00 PM


Kiwi Flutter and Echino Kitchen Honeybees

When is it really going to be Spring? It seems like it's warm for a day or two, so I finally break out my summer dresses and t-shirts, and then the next thing you know, it's cold and rainy again! Of course, I could be grumpy simply because I have a full-time job, and therefore cannot knit or sew all day lone (as I secretly want to).
Instead, I limit myself to crafting in the evenings. Proof:
Flutter Sleeve cardi
I started the Flutter sleeve cardigan on April 13 (good thing I wrote the date on my Ravelry page!), with yarn purchased on sale at Webs. The reason that I'm not done with this quick project is very simple and very sad: knitting with non-stretchy yarn KILLS my hands. All I have to do is knit a few rows, and my hands will hurt for days afterwards. (Oh! Maybe that's why I'm grumpy...).
In the meantime, I've been improvising a new project: I'm covering my ugly kitchen cabinets with the lovely Echino honeybee fabric pictured above. Did you know that there is not a single tutorial for reupholstering kitchen cabinets? Fortunately, it's not very difficult!
the Kitchen Project

Labels: ,

By Veronique
On Thursday, May 15, 2008
At 5/15/2008 02:30:00 PM